Proteins rarely work alone. Most signaling events, structural complexes, and regulatory mechanisms depend on two or more proteins binding to each other inside the cell.
Co immunoprecipitation, usually shortened to Co IP, is the standard method for confirming that two proteins actually interact. It uses an antibody to pull one protein out of a lysate, along with anything still bound to it.
This guide walks through a complete Co IP protocol, step by step, along with the controls and buffer choices that make the difference between clean data and false results.
What Is Co Immunoprecipitation
Co IP is built on the same principle as standard immunoprecipitation. An antibody captures a target protein, called the bait, from a cell lysate.
The difference is the goal. In Co IP, you are not just interested in the bait. You want to know what else came along with it, called the prey.
If the bait and prey are truly interacting in the cell, the prey protein should still be bound to the bait after the pulldown, and you can detect it by western blot or mass spectrometry.
What You Will Need
• Cultured cells or tissue expressing both proteins of interest
• Lysis buffer with protease and phosphatase inhibitors
• Antibody against the bait protein, validated for IP use
• Protein A or protein G agarose or magnetic beads
• Isotype control antibody, matched to the species and class of your IP antibody
• Wash buffer, usually the same lysis buffer or a milder version
• SDS sample buffer for elution
• Western blot equipment for detection
Choosing the Right Lysis Buffer
This is the step most people get wrong. The lysis buffer needs to break open the cell without breaking the protein interaction you are trying to study.
Harsh buffers like RIPA are great for releasing nuclear or tightly bound proteins, but they often strip away the very interactions a Co IP is meant to capture.
Milder, non ionic detergents protect weak or transient interactions, but may not fully release some proteins from the cell.
Detergent Type
Examples
Best For
Mild non ionic
NP 40, Triton X 100
Preserving weak or transient protein interactions
Stronger non ionic
Digitonin
Membrane protein complexes, gentler than RIPA
Denaturing
RIPA, SDS
Hard to extract nuclear proteins, but disrupts most complexes
Detergent free
Mechanical or osmotic lysis
Highly sensitive complexes that detergents would break apart
Co IP Protocol: Step by Step
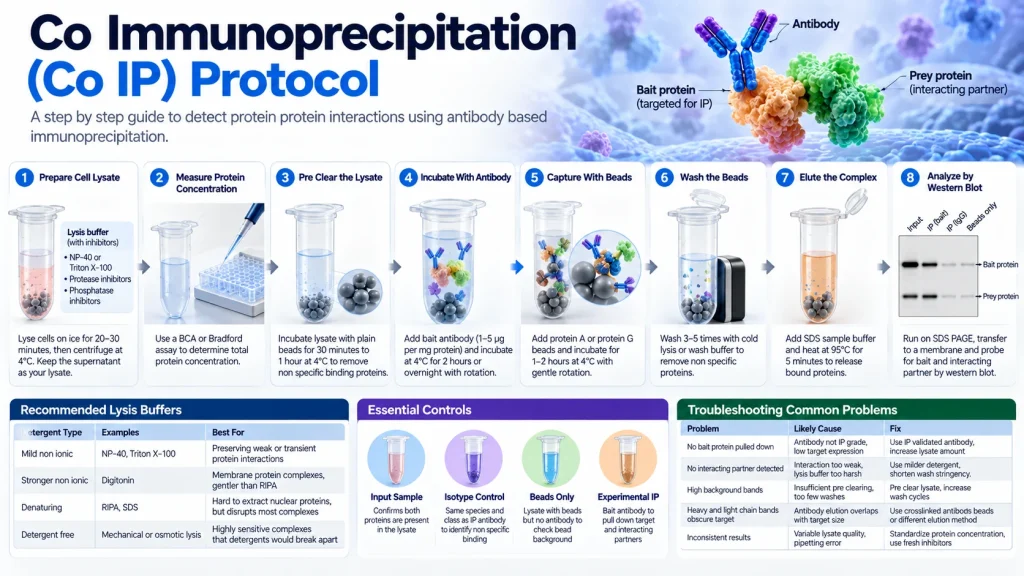
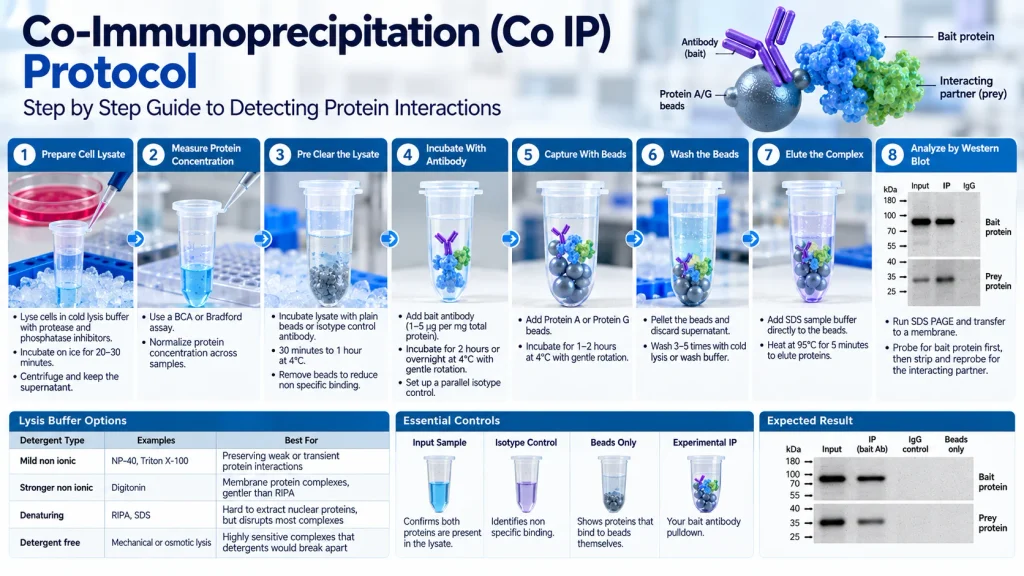
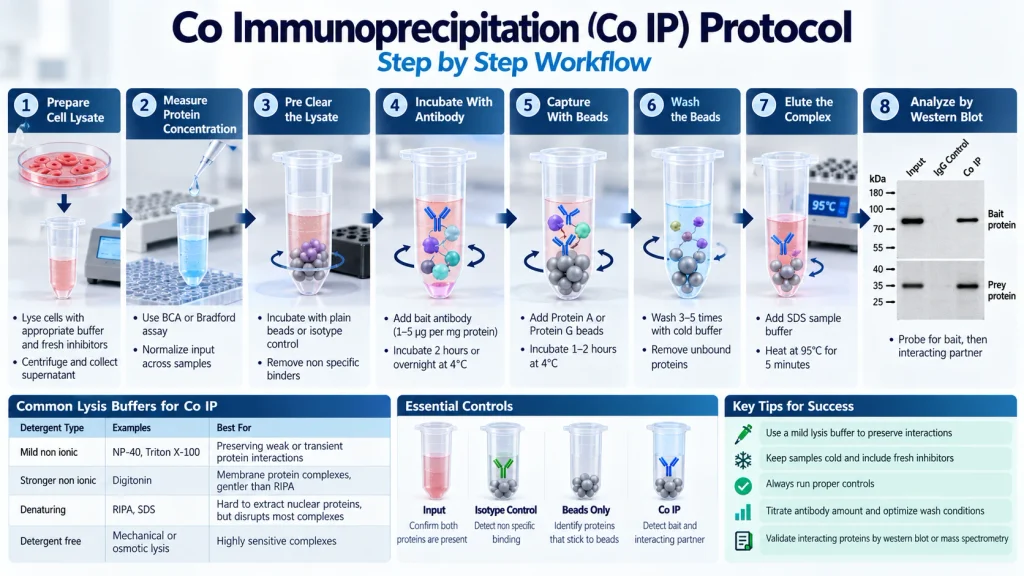
Step 1: Prepare the Cell Lysate
Wash cells with cold PBS and add lysis buffer containing fresh protease and phosphatase inhibitors.
Incubate on ice for 20 to 30 minutes, then centrifuge at high speed for 10 to 15 minutes at 4°C.
Keep the supernatant. This is your lysate. Discard the pellet.
Step 2: Measure Protein Concentration
Use a BCA or Bradford assay to determine total protein concentration.
This lets you normalize input across samples, which matters for comparing conditions later.
Step 3: Pre Clear the Lysate
Incubate the lysate with plain beads, or beads coated with an isotype control antibody, for 30 minutes to 1 hour at 4°C.
This step removes proteins that stick to beads non specifically, before they have a chance to contaminate your real pulldown.
Step 4: Incubate Lysate With Antibody
Add your bait antibody to the pre cleared lysate, usually 1 to 5 micrograms per milligram of total protein.
Incubate at 4°C, either for 2 hours or overnight, with gentle rotation.
Always set up a parallel tube using isotype control antibody at the same concentration.
Step 5: Capture With Beads
Add protein A or protein G beads to the antibody lysate mixture.
Incubate for 1 to 2 hours at 4°C with gentle rotation, allowing the beads to bind the antibody complex.
Step 6: Wash the Beads
Pellet the beads using centrifugation or a magnetic rack, then discard the supernatant.
Wash 3 to 5 times with cold lysis or wash buffer, resuspending and pelleting each time.
Step 7: Elute the Protein Complex
Add SDS sample buffer directly to the beads.
Heat at 95°C for 5 minutes to release everything bound to the beads, including bait and prey proteins.
Step 8: Analyze by Western Blot
Run the eluted sample on SDS PAGE and transfer to a membrane.
Probe first for your bait protein to confirm the pulldown worked, then strip and reprobe for your suspected interacting partner.
Controls You Cannot Skip
• Isotype control: Same species and class as your bait antibody, run through the full protocol to identify non specific binding
• Input sample: A small amount of lysate saved before the IP step, run alongside your pulldown to confirm both proteins were present to begin with
• Beads only control: Lysate incubated with beads but no antibody, useful for identifying proteins that stick to the beads themselves
Without these controls, a band on your final blot tells you very little. With them, you can say with confidence whether the interaction is real.
Troubleshooting Common Co IP Problems
Problem
Likely Cause
Fix
No bait protein pulled down
Antibody does not work for IP, low target expression
Test antibody in IP grade applications, increase lysate amount
No interacting partner detected
Interaction too weak, lysis buffer too harsh
Use a milder detergent, shorten wash stringency
High background bands
Insufficient pre clearing, too many washes skipped
Pre clear lysate with beads, increase wash cycles
Heavy and light chain bands obscure target
Antibody elution overlaps with target size
Use crosslinked antibody beads or a different elution method
Inconsistent results between repeats
Variable lysate quality, pipetting error
Standardize lysate concentration, use fresh inhibitors each time
Frequently Asked Questions
What is the difference between IP and Co IP
IP isolates one protein. Co IP isolates that protein along with any partners still bound to it.
How much antibody should I use for Co IP
A common starting point is 1 to 5 micrograms of antibody per milligram of total protein lysate.
What lysis buffer is best for Co IP
Mild non ionic buffers like NP 40 or Triton X 100 best preserve protein interactions.
Why do I need an isotype control in Co IP
It shows which bands are due to non specific binding rather than a real interaction.
Can Co IP detect weak or transient interactions
Sometimes, but weak interactions are easily lost. Crosslinking before lysis can help stabilize them.
How long does a Co IP protocol take
A standard Co IP takes 1 to 2 days, depending on incubation times chosen.
Why is my Co IP showing high background
This usually means the pre clearing step was skipped or washing was insufficient.
Fast & Free Shipping
Free shipping on orders $999+
Quality Guarantee
Advenit post multos Scudilo Scutariorum tribunus velament
Secure Payment
We accept credit cards, PayPal, and bank wires
Lifetime Customer Support
Responsive and knowledgable customer service via email, text or phone